
Canada Goose Jacket Torn — Can It Be Repaired?
Expert’s Answer from a Bangkok Specialist with 15+ Years in Luxury Garment Repair
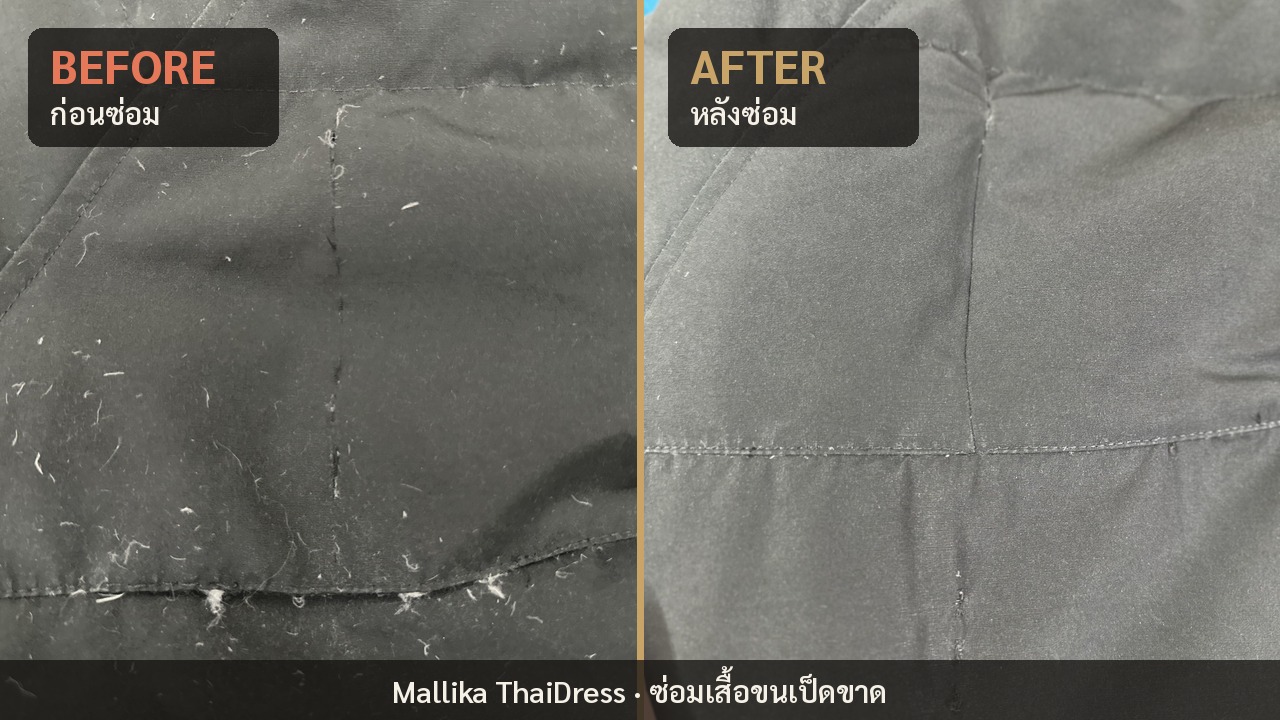
Watch the Canada Goose repair
We open the original seam, repair the tear from the inside, then sew the seam back so the down cannot escape.
The short answer is yes — a torn Canada Goose jacket can be repaired, but only if the person doing the work understands exactly what they are repairing. Canada Goose uses a construction method called Baffle Construction, which creates internal chambers that trap down and prevent it from shifting. That structure is what makes the jacket so warm — and what makes repairs far more complex than stitching an ordinary coat.
I have repaired Canada Goose parkas, Expedition parkas, and Chilliwack bombers in my Bangkok atelier for over a decade. This article explains why the repair is technically demanding, what types of damage are fixable, and what the process looks like step by step.
Why Repairing a Canada Goose Is Different
Every Canada Goose down jacket is built in three layers:
- Outer shell — Arctic-Tech™ fabric: a dense, wind-resistant polyester blend with a DWR (Durable Water Repellent) finish. It is tough but not infinitely so — zipper pulls, sharp edges, and even friction can tear it.
- Down fill layer — the baffles: internal channels sewn in a grid. Down (90/10 white duck or goose down) is locked inside each baffle. If you stitch through the wrong layer, you either collapse a baffle or create a channel for down to escape.
- Inner lining: a smooth nylon or polyester lining that sits against the body. Tears here are usually easier to fix but still require matching thread weight and tension.
A tailor who does not understand this structure will sew through all three layers at once, crushing the baffle and causing down to leak along the new seam. The jacket may look repaired from the outside but will lose insulation within weeks.
Types of Damage — What Can Be Repaired?
| Type of Damage | Layer Affected | Repairability | Visible Repair Seam? |
|---|---|---|---|
| Small tear (<2 cm), outer shell | Shell only | ✓ Excellent | Barely visible |
| Medium tear (2–5 cm), outer shell | Shell only | ✓ Good | Fine seam, matches fabric grain |
| Large tear (>5 cm) or L-shaped tear | Shell + baffle | ~ Moderate | Seam visible on close inspection |
| Baffle torn — down escaping | Baffle & fill | ✓ Good | Internal work; exterior seam minor |
| Zipper seam separation | Shell seam | ✓ Excellent | Hidden in seam allowance |
| Burn or acid damage | All layers | ✗ Limited | Patch required; always visible |
| Inner lining tear | Lining only | ✓ Excellent | Hidden inside |
Note: repairability assumes the fabric has not degraded from UV, chemical exposure, or previous failed repair attempts. We assess every jacket individually before quoting.
Our 4-Step Repair Process
Inspection & Layer Mapping
We examine the jacket under strong light and photograph every damage point. We identify which layers are affected — shell, baffle, or lining — and mark a repair plan before any thread is cut. We also check the DWR coating around the tear to decide whether a seam sealer is needed post-repair.
Down Lock-Down
Before opening any seam, we temporarily contain the down in adjacent baffles using fine hand stitches or a thin running stitch at the baffle wall. This prevents down from migrating into the work area and escaping through the opening while we stitch.
Layer-by-Layer Stitching
We repair each layer independently, working from inside out. The baffle wall is hand-stitched first with waxed nylon thread to restore the chamber. The shell is then closed with a double stitch that matches the original thread tension and grain direction. We use thread colours matched to the jacket’s original palette.
Final Verification
The repaired area is inspected by touch and eye at multiple angles. We tug-test the seam to confirm it holds under realistic stress. For outer-shell repairs, we apply a small amount of seam sealer along the new stitchline to restore water resistance. The jacket is lightly steamed and photographed before return.
Frequently Asked Questions
Can a torn Canada Goose jacket be repaired?
Yes. Most tears — from small punctures to large rips on the outer shell, baffle, or lining — can be repaired successfully, as long as the fabric has not been chemically damaged or previously repaired incorrectly. The key is a tailor who understands Baffle Construction and can stitch each layer independently to prevent down from escaping.
How long does Canada Goose repair take in Bangkok?
Standard repair takes 7–10 working days. We recommend booking an appointment before dropping off the jacket so we can confirm the repair scope and timeline in advance.
Will the repair seam be visible?
For small to medium tears, the seam is barely visible — thread colour is matched and stitching follows the fabric grain. For large or L-shaped tears, a fine seam will be visible on close inspection, but the fabric will be fully closed and down will not leak. We always show you a preview before final delivery.
Do I need to send it to Canada Goose for warranty repair?
Canada Goose’s warranty covers manufacturing defects, not accidental damage. For tears caused by wear, snagging, or accidents, the warranty does not apply. An independent specialist repair is typically faster, more affordable, and does not require international shipping. We repair Canada Goose jackets from clients across Southeast Asia and beyond.

Woon Khiaozen (วุ้น เขียวเซ็น)
Master tailor and founder of Mallika Thaidress. 15+ years specialising in luxury dress alteration and designer-brand garment repair — from Thai silk gowns and qipao to Canada Goose, Moncler, Dior and Chanel. Clients from 30+ countries. All diagnoses and repairs done in-house in Bangkok.
View full credentials →📌 Woon Khiaozen Designer
Free consultation on garment repair and alteration · We reply every day
Not sure if your Canada Goose can be repaired? Send us a photo — free assessment, no obligation.
Call 062-639-6195